Sunday, March 29, 2009

Cupcake Cuttlebug Challenge


My Cuttlebug complements my darling Cricut perfectly; they are the tools I find myself using a lot! Finding new ways to use the Cuttlebug is FUN. For this week Cuttlebug Challenge where Regina (from Bitten by the Bug) who also owns The Cutting Cafe, is sponsoring, I was excited to see that cupcakes was the theme! I LOVE CUPCAKES :)....

I wanted to do something different to play :) ... so I had this green mesh basket that came when I bought some strawberries, and I had already taken it apart to use a piece on a previous project. I had a big piece of it on my stash left; so I used my Cuttlebug stacked with the A Plate, the cupcake bottom cut, the Wizard tan mat, the blue mat that comes with the Wizard kit, and the B Plate. This gave the cupcake bottom (the wrapper) an embossed criss-cross look.

I cut the cupcake card using Cricut Hello Kitty Greetings cartridge and Cricut Design Studio to weld the cupcake cut to the "Happy Birthday" card. I also used DCWV glitter paper for the cherry and the white frosting - love this paper, it gives the card the perfect shine :)...


I used the Cricut to cut an envelope with the same PP as the inside of the card and used a cherry stamp on the tag to tie it in with the card :). Tag was hand cut, use the Cuttlebug die to cut the circle - it was fun to play:) The sentiment is from Hero Arts Cupcakes, which goes perfectly with the card. It was so much FUN making this card and playing with the different tools. Thanks for stopping by :)


Supplies:
Cricut Design Studio and Hello Kitty Greetings Cartridge
cherry - Hero Arts
Cupcakes
"you deserve a day sprinkled with FUN!" - Hero Arts Cupcakes
Fiskars scallop dot edge punch
DCWV Glitter Stack, DCWV texture cardstock, DCWV PP
Red ribbon from M's


Friday, March 27, 2009

TCP Tuesday Challenge - TCPTUES51


This week's TCP Tuesday Challenge, hosted by Leigh O'Brien, is a sketch challenge :) - it is a great sketch, one with many layers - a challenge for me that is for sure!

Here is the sketch - I like the clean lines and that flower/scalloped sentiment. I immediately knew I wanted to do another Easter card, use some kind of flower embellishment and I just HAD to ink that Birds on a Branch stamp from Beans & Bunnies & Peeps, Oh My! - they are just too cute!

Here is my take on the sketch :) - I am enjoying using these prisma flowers on my projects - yeah Spring!


I did struggle with measuring, spacing things just right and cutting the different strips - but this is why sketches are such a challenge for me :)

I used Prismacolor pencil to color the image along with a little gamsol to blend the color. This is still new to me and I'm still learning how to do this, but I did have a great time playing :)

I really like the soft colors that I achieved with the Prismacolor pencils. I will work on shading next; but for now I am happy with the results :) - I really like this stamp; and the sentiment is too perfect and FUN!


Supplies:
Birds on a Branch - The Cat's Pajamas Beans & Bunnies & Peeps, Oh My! S-8633
"An Easter Bonnet can tame the wildest chick" - The Cat's Pajamas
Beans & Bunnies & Peeps, Oh My! S-8633
DCWV PP, DCWV Cardstock Texture Paper
Vintage Sepia Versafine Ink
Prismacolors pencils

Prisma flowers

Tuesday, March 24, 2009

Little Note / ESS Sketch #29


I needed to make a quick little note card to send to a family member who is having a tough time with her diabetes and being stubborn about switching to Splenda. Along with this card, I plan to send her a little bag filled with Splenda to encourage this switch :) - she is like a mom to me so I need her to take care of herself :)

Here is my take on this sketch:


The Eat Sleep Stamp ESS Sketch #29 came to mind - actually it came to the rescue :)... it promised a great look with clean lines.

I was encouraged by Tracy Clemente sample card for this challenge to use my A MUSE stamps - so I went with the first set I pulled out - A Stitched Garden Set.

I used a gem for the birdies eye... really love that PP; I got it at Costco after being enabled :) and it is a huge stack... so I was glad to use some of it! I had my doubts about this image though - this set was an impulsive buy :)- but once I colored it, it looked cute :)

Supplies:
stitched birdie - A MUSE
A Stitched Garden Set
"a little note" - A MUSE A Stitched Garden Set
My Mind's Eye 2007 Wild Asparagus
Tonic Studios ticket punch

DCWV Texture Paper
Prima flowers
Momento Lilac Posies ink

Momento Sweet Plum ink
Making Memories yellow brad
Ribbon from M's

Sunday, March 22, 2009

Baby Shower Card - gift card holder


I am always grateful for the creativity that others share, because when I'm at a lost of what to do for this or that, I can mentally go back to seeing something someone did that either inspires me or I can scrap lift :) ideas.

I needed to do a card for a baby shower a few weeks ago - my husband's cousin who is expecting his first baby - a baby girl. We bought them a gift card and I remembered Jill from Diva In Pink's Thoughts & Ideas had made this really cute baby bottle gift card holder. Jill shared this cut file on her blog along with directions and sample on how it would look once cut (thank you, Jill - your instructions were helpful and your cut works beautifully).

Here is my take on Jill's baby bottle gift card holder:

I used Design Studio to create an envelope from Wild Card cartridge big enough to fit the bottle that measures, 8'' by 4 1/2''.


Love that little chickie tag that I found to dress up the ribbon :) The idea is you pull on the top of the bottle to pull out the insert that holds the gift card. Here is what the insert looks like:

The safety pin comes from the negative space that was cut when cutting envelope (and of course I could not just throw it away) - it looks like it is pinning the tag together :). You open the insert and this is what you see:

I used a piece of PP from the envelope (it happens to spell "HI") to hold the gift card :) ; and dressed up the gift card with a "b" also cut from the same PP. Too bad the gift card is blue :) - but dressing it up a bit helped tone that down. The bow is a Martha punch, very girly.

I had a great time making this card! Thanks again Jill :) ...

Supplies:
Baby Bottle gift card holder - cut using Jill's cut file from her blog post
Diva in Pink's Thoughts & Ideas : Welcome Baby
Cricut Design Studio, Plantin Schoolbook/New Arrival Cartridge(card, insert) and Wild Card Cartridge (envelope)
sentiment - Cloud9 Design Simple Thoughts- Baby
DCWV PP, DCWV Texture Paper, DCWV Nana's Nursery Baby Girl
Martha Stewart Bow Punch
chickie metal tags - Making Memories w/ tag curl tool
Ribbon from M's
Momento Rose Bud

Friday, March 20, 2009

studio G Challenge Time SGC4 - ATC Card


On the Paper Craft Planet Studio G Collectors group, Marti has another challenge for us, to create Easter ATC card. I have never made an ATC Card so I had to do a little research; since studio G stamps are small stamps, an ATC card that measures 2.5 x 3.5 inches seemed to be perfect way to use them.

Here is what I came up with last night, again I used all scraps :) - trying to dwindle down my scrap stash!


This was very quick to put together and had FUN doing it :)


UPDATE on 4/15/2009: So what do you do with an ATC card??? I found out I could turn it into a CARD :) - so I took this little guy and made this card:

Makes a very nice Easter card, I'm loving the look :)


Supplies:
"Hoppy Easter" - Studio G Series 29
Easter eggs - Studio G Series 29
Easter bunny - Studio G Series 29
Versafine Sepia ink
atyouSpica for added glitter
DCWV Pattern Paper and Texture Paper
EK scallop scallop edge punch
Making Memories yellow brads
Cuttlebug Swiss Dots
Cuttlebug Flowers
Butterfly gem from M's
Ribbon from M's

Thursday, March 19, 2009

Lucky TCPTUES50 part 2 / ESS Sketch #28


This year I needed to make a two St. Patty's Day cards -a bit belated. This one is my last one, where I used the same stamps and leftover pp from my first card on the last post.

This is what I came up with for this second card:


I had wanted to particpate in Tracy Clemente weekly Eat Sleep Stamp ESS Sketch#28 so when I needed a sketch for this other card, I had hers in mind. This is the sketch for this week.

I like her sketches because they are CUTE, easy to follow, easy to work with and create great results!

Stamp image of Sprinkle and clover made out of hearts is the same one I used on my last post, but I colored in swirls with a gold Spica marker to add more gold and did not use it to embelish the pattern paper. I hand cut those photocorners trying to talk myself out of purchasing those cute EK photo corner punches! :) I used that scallop Martha punch that has a leafy design - seems to go good with the PP paper.

A quick card that came together fast...and since I've been sick for days, that is exactly what I needed!

Supplies:
"You're a Treasure" -The Cat's Pajamas
Arrgh! Piratey S-7545
clover - 3 hearts from The Cat's Pajamas
Be Still, My Beating Heart S-7513
Sprinkle holding a vase - from the The Cat's Pajamas
Cat & Flower F-7442
atyouSpica for added glitter
Momento Black Tuxedo Ink
Momento Cottage Ivy Ink
Momento Bamboo Leaves Ink
DCWV PP, DCVW Glitter PP from Christmas 2007, DCWV texture paper
Making Memories gold brad


Wednesday, March 18, 2009

TCP Tuesday Challenge - TCPTUES50/ Mojo Monday 78 Sketch


For this week TCP Tuesday Challenge, #50 (WOW), our hostess, Karrie from Burnin' Rubber is celebrating St. Patty's and she is challenging us to use TCP St. Patty's images and go GREEN!!! Karrie, you are so much FUN...

This evening, after a very long day, I wanted to ink something :) So when I saw Karrie's challenge, I knew I wanted to play but I had to improvise since I don't have any TCP St. Patty's images (and part of the fun for me, of the TCP Tuesday Challenges is to play with my TCP stamps!). Usually I don't do cards for this day although I usually do wear the green :)... but this time I will be doing a couple - even if they will be late getting to those who I intend to sent to :). Somehow they are used to that!

I got my inspiration from Karrie's card, and seeing Sprinkle sitting inside a pot of gold... CUTE! So with the help of my darling Cricut and other TCP stamps, this is what I came up with:

I needed a sketch idea and found that in this week Mojo Monday Sketch 78, I love their sketches, but I have not played for a while... this sketch caught my attention. Again, I layered!!! (that is always a challenge!)

I stamped Sprinkle from Cat & Flower stamp, inking up to the stem. I then made a clover by stamping three hearts from Be Still, My Beating Heart set, love the swirls on this small heart stamp!

I found this St. Patty's PP from an old stack of DCWV that I must of pulled apart... this was an easy choice, I only had two different designs to choose from:)... The green glitter paper is from a xmas stack :). I used my Cricut for the pot of gold and used Gold Stickles for the bling. Needed a sentiment so I found a perfect fitting one on Arrgh! Piratey, You're a Treasure.


Card came together nicely and I needed that jolt of FUN today!


Supplies:
"You're a Treasure" -The Cat's Pajamas
Arrgh! Piratey S-7545
clover - 3 hearts from The Cat's Pajamas
Be Still, My Beating Heart S-7513
small stamp on PP - from The Cat's Pajamas
Be Still, My Beating Heart S-7513 (looked Irish to me :)
Sprinkle holding a vase - from the The Cat's Pajamas
Cat & Flower F-7442
Pot of Gold - cut at 1 3/4'' using Cricut Paper Doll Dress Up cartridge
Ranger Stickles Gold
atyouSpica for added glitter
Momento Black Tuxedo Ink
Momento Cottage Ivy Ink
Momento Bamboo Leaves Ink
Ribbon - M's
DCWV PP, DCVW Glitter PP from Christmas 2007, DCWV texture paper
Tonic Studios ticket punch
Making Memories gold brads


Monday, March 16, 2009

Sending Flower Pocket Cards


Jen at {Brain Things....} posted on Sunday a request to her fellow blog friends to help her send well wishes to someone who is ill in the hopes of uplifting her spirits. Her name is Linda and she sounds like a fighter!

I immediately thought of Jen's flowerpot pocket card, a cut file for the Cricut that she so nicely shared just recently. My mom loved those potted plants, they cheered her up. So I am hoping that Linda is cheered up with this card.

I really am in awed of this cut file by Jen - well, I am in awe of Jen :), the mailbox that I created with her cut file is still being admired by the hubby :)... check out her blog, she just is amazing! :) ... I liked the cleverness of this cut, so I did two - perfect, because 2 pots can fit on a one 12x12 paper. The second card is a spring card I made for a special someone :)...

Here are both cards, they measure about 6 1/2'' by 5 1/2'':

Here is Linda's card with envelope, and ready to mail - but will use a separate envelope so it will make it to her in one piece!


Here is what the tag looks like that goes nicely inside the pot; I had so much fun gluing some of the leafs with regular glue dots and some of the leafs and flowers with3D glue dots so that some pop out, allowing them to hang off the top of the pot (all included in that amazing cut file!). I added a little glitter on the flowers; doesn't show very well but it goes nicely with the glitter on the DCWV pp. The metal tag says "Smile" and the inside sentiment says "see the flowers smiling" - hope it makes her smile!
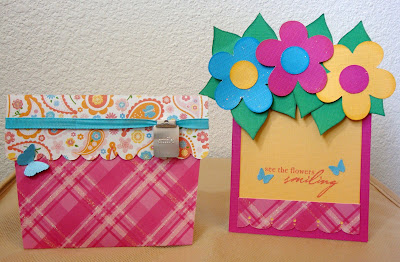

Here is what the spring tag looks like, I added a little less glitter on the flowers because the intended person is not too much into glitter :). I also used my Martha butterflies punch to decorate both the pot and the tag. The metal tag says "Spring" and the inside says "Celebrate Spring".

I was not feeling too well this weekend; that darn bug going around took a bite... but I had a blast making these... if only in stages. If you are interested in sending Linda a card, please visit Jen's Sending Well Wishes post for the details - this lady's ordeal just grabbed me.

Thanks for stopping by!

Supplies:
Flower Pot Pocket Card - cut using Jen cut file from her blog post
{Brain Things....} : I Love Spring!
Cricut Design Studio, George Cartridge (card, flowers, tag) and Doodlecharm Cartridge (envelope)
"see the flowers smiling" - Hero Arts
Anytime Message
"Celebrate Spring" - studio G stamp
Momento Rose Bud ink
Various Colorbox Cat's Eye ink for shading the edges
Martha Stewart 3in1 butterflies punch
Martha Stewart elegant scallop edge punch (inside tag)
Martha Stewart glitter
metal tags - Making Memories w/ tag curl tool
ribbon - M's
DCWV PP Butterflies and Blossoms Stack (pot)
DCWV PP 2007 Spring Glitter Stack (scallop top of pot)
DCWV texture cardstock


Saturday, March 14, 2009

In the Highway of Life You Carry the Gift


The challenge this week at Bitten by the Bug (BBTB) is to make a card using the Highway Sign from the Cricut Going Places cartridge. Regina did it again, another great challenge! I had these scraps sitting on my desk from my previous TCP card (a color challenge) - the blue DCWV PP had a glitter swirl that caught my eye and I had to do something with it.

So continuing to use my scraps, I made this card for my sister. She is going through some hurdles in life right now and this is reminder that in the highway of life she carries the gift of those who love her and always want to see her succeed in life :) ...

The highway sign cut by my darling Cricut made a perfect frame for this A MUSE cute little VW bug stamp; yellow is appropriate because my sister use to have a yellow car, we dubbed it the banana boat. Ahh... memories. The gift on top of it was just too perfect! :) I used the wavy dotted punch to show how the road of life is full of up and downs :) And this of course will be sent with love.

The PP, the shape of the card and the ribbon is very much like a typical A MUSE card; so overall this card came together just right :) ... (thanks Tracy for the many splendid classes, I have learned A LOT!)

Supplies:
Car with gift - A MUSE Simple Thoughts
"with love" - A MUSE Simple Thoughts
Highway Sign- cut at 2 3/8'' using Going Places cartridge
A MUSE gems
EK Dotted Wave edge punch
PP is DCWV Sweet Stack and Spring 2007 Stack
Prima Flower
atyouSpica for added glitter
Momento Rich Cocoa Ink


Wednesday, March 11, 2009

TCP Tuesday Challenge - TCPTUES49


This week's TCP challenge is hosted by Jen del Muro from i {heart}2stamp! Yes, I am a fan :)... her color challenges ARE VERY challenging for me (although I do find it easier than sketches!!! :)). I agree with Alma, the colors do remind me of EASTER candy, you know those almond covered chocolate that are shaped like Easter Eggs :) ... I love those!!!

On Monday, Jen also posted a Sketch for You to Try and I usually have a HARD time with sketches but I could not pass the opportunity to do two challenges in one! Love it when it works out that way :).

The sketch caught my eye... why? Because of all those layers! Layers are something i don't do very well so another challenge!


I do find myself referring to Jen's sketches when I need an idea for a card. Using this one was FUN!!!


I decided to continue to ink those CUTE new TCP Spring stamp sets that I just got. This time I used Beans & Bunnies & Peeps, Oh My! and that bunny said Easter and those Jelly Beans are just as yummy as those easter almond chocolates!!!

I got to use my Martha Stewart border punch exactly how I had seen others use it! The colors are the closest thing I had to those in the color challenge and I used some brown ink. I added some stickles to his bunny tail...it matches the cardstock nicely :)...Here is a more sketch like view :) I layered!!! I think I counted 8 layers!!! I was so happy when I found this light yellow button in my stash; i threaded a piece of pink cardstock ( I got to get some floss!)

I had so much fun tonight working on this card; what a stress reliever it was! And I think this is the earliest I've gotten a TCP challenge done! Usually, I'm squeezing time at the last minute :)...


Supplies:
Jelly Bunny - The Cat's Pajamas Beans & Bunnies & Peeps, Oh My!
S-8633
"Step Away from the Jelly-Beans!" - The Cat's Pajamas Beans & Bunnies & Peeps, Oh My! S-8633

DCWV Spring Stack 2007, DCWV Sweets and DCWV Cardstock Texture Paper

Button from Hero Arts
Martha Stewart Fence edge punch
Crystal Ranger Stickles
Vintage Sepia Versafine Ink


Tuesday, March 10, 2009

studio G Challenge Time SGC3 - Invitations


One of my hobby (a hobby within a hobby) is to collect studio G stamps (both wooden and clear); somehow I can't help but love their various designs and the $1 price tag. They are the cutest; and with the help of friends who scavenge hunt around for them with me (THANK YOU TRACY), I have manage to have a pretty big collection. They are relatively easy to store, especially the clear ones - I use baseball card holders and store them by theme. They come in handy at times; especially their sentiments.

Luckily, I have found other studio G lovers on Paper Craft Planet Studio G Collectors group. A relative new site - but this group holds lots of promise; especially in challenging me to use these stamps. I decided to participage in their Challenge Time SG3 - Invitations where we had to make an invitation card with studio G "invite" info stamps. That perked my interest- Marti wanted us to INK our little collection - what a concept!

The card was made all out of scraps (nothing NEW, not even the stamps :) - and I plan to use this card for my invites to our annual Mother's Day brunch this year :) I used my Cuttlebug circle dies to make those circles on the frame. I ironed that ribbon that looked beaten up after being at the bottom of my scrap stash; now it looks good as new :)...


I popped the sentiment for extra dimension and used atyouSpica for added glitter. Here is the inside of the card, where I used invite info stamps - need to fill in the details later (not too sure about the circles but I could not throw them away; had to use the scraps!)


{update on 3/21- didn't like the circles so added this cute punchout from Martha Stewart punch}

The card was FUN to make!!! And best of all I INKED those stamps! :)

Supplies:
"You're Invited" - Studio G Series 2
"event, place, date, time" - Studio G Series 11 (stamped inside)
"Happy Mother's Day" flower - Studio G Series 12
green leaf - Studio G Series 16
daisy flowers - Studio G Series 16
flower - Studio G Series 16
Martha Stewart Scallop Edge punch
Martha Stewart 3in1 butterflies punch
Momento various colors inks
VersaMagic Sea Breeze
atyouSpica for added glitter
DCWV Pattern Paper and Texture Paper


Saturday, March 7, 2009

TCP Tuesday Challenge - TCPTUES48


For this week challenge, our talented hostess Toni gave us an inspirational picture - one that is springy, colorful and FUN - and I would love to buy for myself!

I really enjoy inspirational challenges, because it forces me to use different color combinations that I normally would not use - but I always tend to mimic what I see. I see clean lines, and my eyes focus in on that yellow and that green pattern along with the dark blue borders of the shams - and that is what I tried to reproduced.

I made this card for my friend Jess who came for a visit - we enjoyed seeing her and catching up with each other! This card is to say hello and wish her luck in her new relationship. I manage to find a green pattern paper from DCWV Nana Nursery Baby Boy Stack that matched the inspirational picture perfectly :)... and the button was a fun touch inspired by the bedding with a strip of the yellow pp used to thread it. I used my Scor-Pal to score the lines :)... hard to get the right pic, but click on the picture for a better view.

I used one of the new Cat's Pajamas Clearly Swanky Sets, Hearts and Flowers, that just released last week. I was so eager to ink these and the birdie stamp caught my eye - perfect for this card, two birdies getting to know each other, ahh... :)... See the complete Kitty Kat Pack to check out all three sets, they are CuTE!


Supplies:
Birds of a Feather - The Cat's Pajamas
Hearts and Flowers S-8634
"Hi Chikie!" - The Cat's Pajamas
Hearts and Flowers S-8634
DCWV Pattern Paper and Cardstock Texture Paper
torn paper frame - cut at 3'' using Cricut Calligraphy Cartridge

Onyx Versafine Ink


Sunday, March 1, 2009

March Month Scrapbook Calendar Page


This is my March Scrapbook page for my 2009 S.E.I. Calendar 12x12. I was inspired by the BITTEN by the BUG challenge to use "Life is Good" from Cricut Graphically Speaking Cartridge - yes, last week challenge. As always, I seem to be a bit behind, but as always Regina and team give us something FUN to play along with and I do have a good time with the weekly challenges :)


Supplies:
SEI 12x12 Calendar 2009
"Life is Good" - cut at 2" using Cricut Graphically Speaking
"Enjoy" - cut at 1 1/4" using Cricut Graphically Speaking
Rounded note paper - cut using Cricut Graphically Speaking and Design Studio

Leaf swirl - cut at 2'' using Cricut Calligraphy and Design Studio
Tall Leaf - cut at 6 1/2'' using Cricut Wild Card


Related Posts with Thumbnails